Brick is the surface that separates people who know what they’re doing from people who are about to cause a few thousand dollars in damage. I’ve run a pressure washing rig around Lexington and Central Kentucky for years, and I see it constantly. Brick looks tough. It sits there through Kentucky ice storms, humid summers, and everything in between. But the mortar holding it together is soft, and when you hit it wrong with a pressure washer, you find out fast.
Most of the calls I get to fix botched brick come from good, well-meaning homeowners who rented a machine from a big-box store on a Saturday and had no idea how much power they were holding. That machine will happily blow the mortar joints right out of a 1970s ranch in Beaumont or an older place near downtown. So I put together this guide on the most common pressure washing brick mistakes Lexington KY property owners make, and how to avoid every one of them.
If you own a home in Hamburg, manage rental units in Chevy Chase, or take care of a commercial building on Nicholasville Road, understanding these pressure washing brick mistakes Lexington KY residents run into will save you money and keep your masonry standing for another few decades.
Why brick is tougher to clean than people think
Before we get into the mistakes, you need to understand what you’re actually working with. Brick is porous. It’s basically fired clay full of tiny air pockets, and it soaks up water like a sponge. The mortar between the bricks is even softer than the brick itself, and it’s the weak link in the whole wall. When cleaning goes wrong, it’s almost always the mortar that fails first.
Here in Central Kentucky we have a couple of things working against us. Our humidity feeds mold, mildew, and algae, so brick that faces north or sits under trees gets that green-black film pretty quick. We also get real freeze-thaw cycles in winter. That matters because any water you force deep into the brick can freeze, expand, and crack the masonry from the inside out. That’s the whole reason so many pressure washing brick mistakes Lexington KY homeowners make turn into structural problems instead of cosmetic ones.
Lexington also has a lot of older housing stock. The historic neighborhoods around downtown, plus plenty of homes from the 1920s through the 1960s, use lime-based mortar that’s far weaker than modern Portland cement mortar. If your house is 75 years old or more, the rules change completely. What’s safe on a 2015 build in Andover can destroy a 1935 build near Ashland Park.
Keep all of that in the back of your mind as we walk through these seven mistakes.
Mistake 1: Using way too much pressure (PSI)
This is the big one. Number one on every list, and the mistake I clean up after most often. People assume more pressure equals a cleaner surface, so they crank the machine wide open and get after it. On brick, that’s exactly backward.
Here’s the tension in the numbers. Some sources will tell you brick can handle 2,000 to 3,000 PSI. And technically a hard-fired brick face might survive that. But the mortar joints will not, and neither will older brick. That’s why most professionals who actually work on brick day in and day out recommend a much lower range. For house washing on brick, I want to be somewhere around 500 to 1,000 PSI, and for anything old or fragile I drop to 800 PSI or lower.
What happens when you go too high? A few things, none of them good:
- Mortar erosion. The soft mortar joints wash out. Once that grout line is gone, water gets behind the brick and the whole wall starts to loosen.
- Chipping and scarring the brick face. You literally blast off the fired outer skin of the brick, exposing the softer, more porous clay underneath. That speeds up future deterioration.
- Water driven deep into the wall. This is the one that bites you months later. Water forced into the masonry sits there, feeds mold inside the wall cavity, and in our winters it freezes and cracks things apart.
The honest truth is that most brick around Lexington doesn’t need high pressure at all. The dirt, mold, and mildew on residential brick comes off with a soft wash approach, where the cleaning solution does the work and low-pressure water rinses it away. That’s the professional standard, and it’s the single best defense against the pressure washing brick mistakes Lexington KY homeowners regret. If you’re renting a 3,000 PSI machine and pointing it at your house, you’re gambling with your mortar.
Mistake 2: Grabbing the wrong nozzle
You can have your PSI dialed in perfectly and still wreck brick with the wrong nozzle. The nozzle is what concentrates that water into a stream, and a narrow stream on brick is like taking a knife to it.
The one to never use is the 0-degree red tip. It shoots a pencil-thin jet that’s powerful enough to strip paint, cut into wood, and blow mortar out of a joint in seconds. There is no situation on residential brick where the red tip belongs. I once watched a homeowner draw a perfect groove straight through a mortar line with one because he figured it would clean better. It cleaned, all right. Then the joint needed repointing.
Here’s what to actually reach for:
- 40-degree (white) tip: the widest, gentlest fan. Great for general rinsing and delicate brick.
- 25-degree (green) tip: my go-to for most brick cleaning. Wide enough to be safe, strong enough to move dirt.
- 15-degree (yellow) tip: only for heavy-duty spots, and only with real caution. This is more concentrated and can still damage mortar if you linger.
Some pros do like turbo nozzles on brick, especially paired with lower-PSI machines, because they spin the stream and spread the impact instead of holding it in one line. But a turbo nozzle in the hands of somebody who’s never used one is a fast way to add to the list of pressure washing brick mistakes Lexington KY homeowners make. If you’re not sure, the 25-degree green tip is the safe default. Start wide, keep your distance, and only step down to a narrower tip if you truly need it on a stubborn area.
Mistake 3: Getting too close or camping in one spot
Distance and movement matter as much as the machine settings. You can be at a safe PSI with the right nozzle and still gouge brick by holding the wand two inches off the surface or by pausing in one place.
The reason is simple. Pressure drops off fast the farther the water travels from the tip. Right at the nozzle, the force is concentrated. A foot away, it’s spread out and much gentler. So the safe working distance for brick is around 12 to 16 inches from the surface. That gap gives the water room to fan out before it hits the wall.
Keeping the wand moving matters just as much. When you camp in one spot, even a wide fan concentrates enough energy to start eroding mortar or etching the brick face. You end up with clean streaks and lighter halos where you lingered, which looks worse than the dirt you started with. Use a smooth, steady sweeping motion, keep it moving, and let overlapping passes do the work.
A quick real-world example. I did a house off Tates Creek Road where the previous cleaner had left obvious light spots all over the front elevation. He’d been pausing at each dirty patch and scrubbing it with the stream. The brick was permanently marked. Consistent movement at a steady distance would have prevented every bit of that. This is one of the sneakiest pressure washing brick mistakes Lexington KY folks make, because the damage doesn’t always show until the wall dries and you see the pattern.
Mistake 4: Skipping the pre-inspection and repairs
Nobody wants to hear this part, but you have to look before you spray. Walking up to a brick wall and cleaning it without inspecting it first is how small problems turn into big ones.
Before any water hits the wall, walk the whole exterior and look for:
- Cracks in the brick or mortar. Any crack is an open door for water to get behind the wall.
- Loose or shifting bricks. Push gently. If something moves, it’s not ready to be cleaned.
- Deteriorating or crumbling mortar. If you can scrape mortar out with a screwdriver, the joints are already failing.
- Previous repairs or paint that’s peeling.
If you find damage, get it repaired first. And here’s the part people rush: freshly repointed mortar needs time to cure before you pressure wash near it. Give new mortar at least a week before cleaning, otherwise your water will blow the fresh repair right back out and drive moisture into the wall you were trying to fix.
The other piece here is age. Historic and older masonry, roughly 75 years and up, is a different animal. That soft lime mortar and hand-fired brick can be too fragile for pressure washing at all. On genuinely historic properties, sometimes the right answer is no pressure washing, and instead a gentle hand-cleaning or a very low-pressure soft wash. Knowing when to walk away is part of avoiding the worst pressure washing brick mistakes Lexington KY has to offer, and it’s why a lot of homeowners near downtown call a pro instead of renting a machine.
Mistake 5: Not pre-wetting the brick first
This is the quiet mistake that ruins the look of a wall even when everything else goes right. Because brick is so porous, it drinks up whatever liquid touches it. Spray a cleaning solution onto bone-dry brick and the brick soaks that chemical straight into its pores. That’s how you get staining, discoloration, and blotchy patches that don’t rinse out.
The fix takes two minutes. Soak the brick with plain water first, before any cleaner goes on. That pre-wet fills the pores with clean water so the cleaning solution stays on the surface where it can do its job, instead of getting sucked deep into the masonry. Think of it like wetting a sponge before you add soap, so the soap spreads instead of disappearing into the middle.
Pre-wetting also protects the plants and landscaping at the base of the wall. When you water down your shrubs and grass before applying any cleaner, you dilute anything that runs off and drips down. In Central Kentucky where people take pride in their yards, that matters. Skipping the pre-wet is one of those pressure washing brick mistakes Lexington KY homeowners don’t even realize they made until a month later when the wall dries unevenly or the boxwoods look scorched.
Mistake 6: Using harsh or wrong cleaning solutions
The cleaner you choose is just as important as the machine, and this is where a lot of DIY jobs go sideways. People grab whatever’s under the sink or whatever the strongest product on the shelf is, figuring stronger is better. On porous brick, the wrong chemical burns, stains, or eats the masonry.
Let’s break it down by what you’re actually trying to remove, because Lexington brick tends to have two main problems.
For mold, mildew, and algae (the green-black stuff)
This is the most common issue on shaded, north-facing, or tree-covered brick around here. Organic growth like this responds to a mild detergent or a diluted bleach solution. A common mix is about one cup of bleach to one gallon of water. The bleach kills the growth, and the low-pressure rinse carries it away. This is the heart of a proper soft wash, and it’s far safer for brick than blasting the growth off with pressure.
For efflorescence (the white powdery stains)
Efflorescence is that white, chalky, salt-like deposit you see bleeding out of brick and mortar. It happens when water moves through the masonry, dissolves natural salts, and leaves them on the surface as it evaporates. It’s extremely common on Kentucky brick because of our moisture. Here’s the trap: people reach for muriatic acid to blast it off. Muriatic acid can burn and stain masonry, sometimes turning the brick yellow or leaving worse marks than the efflorescence itself. For efflorescence, use a specialized efflorescence remover or a non-acid masonry cleaner instead.
Two rules apply to every cleaner, no matter what you’re removing:
- Never use a product not designed for masonry. Harsh general-purpose cleaners erode porous brick and cause discoloration.
- Always test in an inconspicuous spot first. Pick a hidden corner, apply your cleaner, let it dwell, rinse, and let it dry fully before you commit to the whole wall. What looks fine wet can look terrible dry.
Picking the wrong chemistry is one of the more permanent pressure washing brick mistakes Lexington KY homeowners make. You can regrow landscaping and you can repoint mortar, but acid-stained brick is a much bigger headache. When in doubt, match the cleaner to the problem and keep it mild.
Mistake 7: Spraying upward or washing in cold weather
The last two mistakes are about direction and timing, and both come back to that porous, water-absorbing nature of brick.
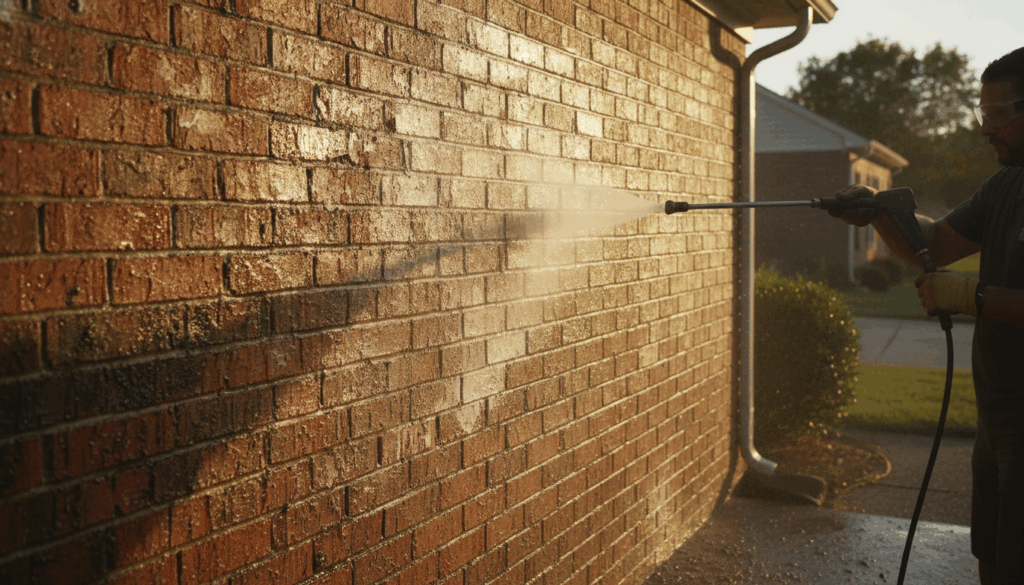
First, direction. Never aim your spray upward into the brick. When you angle water up under the bottom edge of a brick or into a joint from below, you drive moisture behind the wall. That trapped water feeds mold inside the wall cavity and can cause real structural damage over time. Always spray at a downward angle so gravity pulls the water and dirt away from the wall instead of pushing it in. This one small habit prevents a surprising amount of hidden damage.
Second, timing. Do not pressure wash brick in cold weather, especially anywhere near or below freezing. This is huge in Central Kentucky because our winters swing hard and our nights drop below 32 degrees for months. When you wet porous brick and the temperature falls below freezing, the water inside the masonry turns to ice and expands. That expansion cracks the brick and mortar from the inside. You won’t see it that day. You’ll see it in spring when chunks of brick face start flaking off, what masons call spalling.
The practical takeaway for Lexington homeowners: schedule brick cleaning for the warmer, drier stretches of the year. Late spring through early fall is ideal. You want temperatures warm enough that the wall can dry out fully before any freeze, and you want to avoid washing right before a cold snap. Ignoring the calendar is one of the most avoidable pressure washing brick mistakes Lexington KY property owners make, because it’s purely a matter of picking the right day.
Putting it all together: the right way to clean brick
Now that you know the seven mistakes, here’s how a proper brick cleaning actually flows from start to finish. This is the sequence I follow on residential and commercial jobs across Central Kentucky.
- Inspect first. Walk the wall, check for cracks, loose brick, and failing mortar. Repair anything needed and let new mortar cure a week.
- Protect the surroundings. Wet down landscaping, move furniture, cover anything sensitive.
- Pre-wet the brick. Soak it with plain water so it can’t absorb cleaner.
- Apply the right cleaner. Mild detergent or diluted bleach for organic growth, a non-acid masonry cleaner for efflorescence. Test a hidden spot first.
- Let it dwell. Give the solution time to break down the grime. Don’t let it dry on the wall.
- Rinse at low pressure. Use 500 to 1,000 PSI, a 25-degree or 40-degree tip, hold 12 to 16 inches back, keep the wand moving, and spray downward.
- Do it on a warm, dry day so the wall dries fully with no freeze in the forecast.
Notice how little the actual high-pressure part matters in that process. The cleaner and the technique do the heavy lifting. That’s the whole philosophy behind avoiding pressure washing brick mistakes Lexington KY homeowners run into: let chemistry and patience clean the wall, not raw force.
When to call a pro instead of renting a machine
I’m not going to pretend every brick job needs a professional. If you’ve got a small, modern, hard-fired brick surface, sound mortar, and you’re willing to keep the pressure low and the technique right, you can do a decent job yourself. But there are clear situations where calling a pro is the smart money.
- Older or historic brick. Anything 75 years or older, common around downtown Lexington and the older neighborhoods, is fragile and expensive to repair. Don’t experiment on it.
- Visible existing damage. Cracks, loose brick, or crumbling mortar mean the wall needs repair before it’s touched with water.
- Heavy efflorescence or stubborn stains. These need the right chemistry, and the wrong product does lasting harm.
- Two-story or hard-to-reach walls. Working brick on a ladder with a pressure washer wand is dangerous and leads to inconsistent results.
- Commercial buildings and rentals. Property managers are dealing with larger surfaces, tenant safety, and liability. A pro brings the right equipment and insurance.
A professional soft wash setup applies cleaner at low pressure and rinses gently, which sidesteps almost every mistake on this list by design. When someone knows how to read the mortar, mix the right solution, and dial the pressure down, the whole category of pressure washing brick mistakes Lexington KY homeowners worry about just goes away. You get clean brick without the gamble.
Brick cleaning rewards patience over power. Take your time, respect how porous and soft the material really is, and remember that our Kentucky humidity and freeze-thaw winters make the stakes higher here than in a lot of the country. Follow the seven points above and you’ll keep your brick looking sharp and your mortar exactly where it belongs, holding your house together for decades to come.
Frequently asked questions
What PSI is safe for pressure washing brick?
For most brick cleaning, stay in the range of 500 to 1,000 PSI, and drop to 800 PSI or lower for older or fragile brick. High-pressure machines running 2,000 to 3,000 PSI can erode mortar joints and blast the fired surface off the brick. In most cases the cleaning solution does the work, and low pressure just rinses it away.
Can pressure washing damage brick on my Lexington home?
Yes, it definitely can. Too much pressure, the wrong nozzle, or spraying too close blows out mortar and forces water behind the wall, which is especially risky with Central Kentucky’s freeze-thaw winters. Older brick and homes 75 years or older are the most vulnerable and sometimes shouldn’t be pressure washed at all.
What nozzle should I use to pressure wash brick?
Use a wide, gentle tip like a 25-degree (green) or 40-degree (white) nozzle for brick. Never use a 0-degree (red) tip, because its narrow, concentrated stream will cut mortar and scar the brick face. Only step down to a 15-degree tip for heavy-duty spots, and use it with caution.
How do I remove the white powdery stains on my brick?
That white powder is efflorescence, salt deposits left behind as water moves through the masonry. Use a specialized efflorescence remover or a non-acid masonry cleaner rather than muriatic acid, which can burn and permanently stain the brick. Always test any product on a hidden spot first and let it dry before treating the whole wall.
When is the best time of year to pressure wash brick in Kentucky?
Late spring through early fall is best, when temperatures are warm and there’s no freeze in the forecast. Never wash brick near or below freezing, because water absorbed into the porous brick can freeze, expand, and crack the masonry. Give the wall time to dry fully before any cold snap.
Should I pressure wash brick myself or hire a pro in Lexington?
You can do small, modern, sound brick yourself if you keep the pressure low and the technique right. Hire a pro for older or historic brick, walls with existing cracks or loose mortar, heavy efflorescence, or two-story surfaces. Professionals use a low-pressure soft wash approach that cleans effectively without risking damage to your masonry.
Sources
- Can Pressure Washing Damage Bricks? – The Jet Co
- Can Power Washing Damage Brick? | Off The Wall
- Should You Pressure Wash Brick? – Premier Pro Wash & Seal
- Power Wash a Brick House – Is it safe to? – Pinnacle Restorations
- Removing Efflorescence: Essential Insights for Pressure Washing Professionals
- The 8-Step Guide to Cleaning a Brick House with a Hot Water Pressure Washer